If your garage looks anything like ours did, there are bikes and scooters covering half the floor and someone trips over a helmet every time they walk in. This DIY bike rack fixes all of that in a single Saturday afternoon, holds bikes, scooters, skateboards, and helmets, and costs a fraction of what a store-bought rack would run you. We built it with one of our kids and it's been one of the most useful things in our garage ever since.

A quick note on planning: before you cut anything, sketch out your design with the number of bikes and scooters you want to store. Measure the width of each wheel and add a little extra room so things slide in and out easily. The slot spacing will differ depending on what you're storing. The sketch in the video shows our specific measurements, but your garage setup may need something different.
From your 2x4 stock, cut the following:
From your 2x2 stock, cut the following:

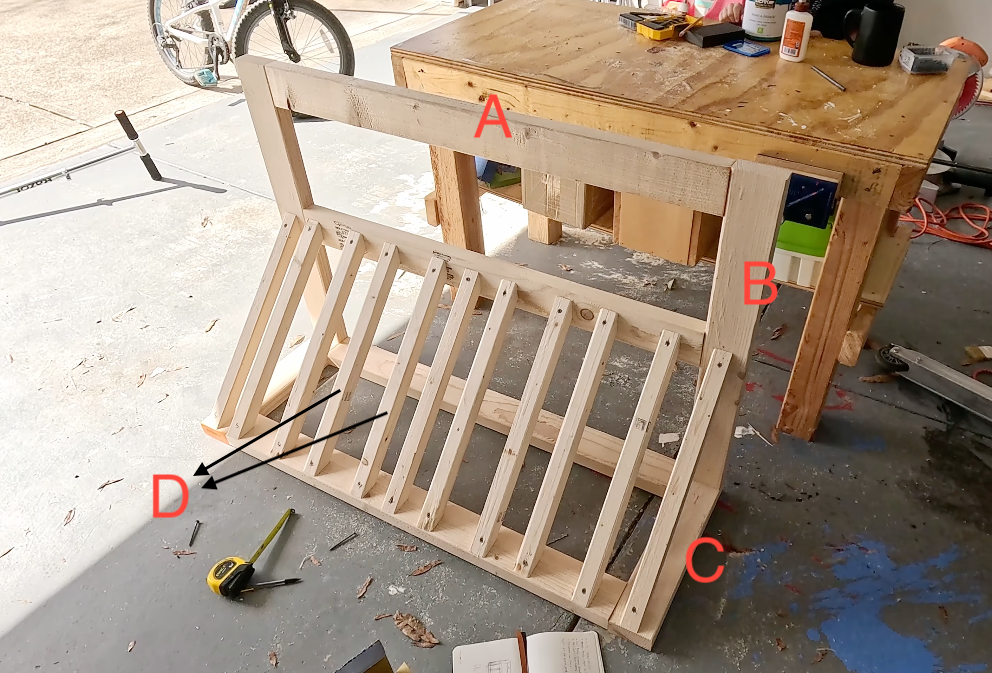
Start by building the vertical back of the frame. Lay out one 40-inch 2x4 horizontally at the top (“A”). Then place the two 30-inch pieces at either end and attach with picket hole screws at the joints (“B”). Drill pilot holes first to avoid splitting the wood.

Measure 13 inches up from the bottom of the 30-inch pieces on the back frame and mark where the bottom of the crosspiece will sit. Attach the crosspiece with pocket hole screws.

Use the two 17-inch pieces to add feet to your frame (“C”). Now flip it over and add the final 40-inch cross pieces to complete the bottom of the frame.
This is where you customize the rack for your specific bikes and scooters. Starting from the left edge, space your 11 slats across the bottom rail according to the wheel widths of what you're storing (“D”). The gaps between slats are what the wheels drop into.

Our spacing from left to right was: 3.5", 3.75", 2.5", 3.75", 2.25", 2", 3.75", 2.5", 3.75", 2.5". Narrower gaps for bike tires, wider gaps for scooter wheels. Measure the gap at both the top and bottom of each slat as you go to make sure they stay parallel.

Screw each slat into the top and bottom rails with deck screws. Pre-drill if the wood is prone to splitting.
Once all slats are in place, test fit your bikes and scooters before moving on. Much easier to adjust spacing now than after painting.

Give the whole rack a once-over with a sanding block to knock off any rough edges, then paint it whatever color you want. We went with blue, which made it look intentional rather than like a lumber pile in the corner of the garage.
Once the paint is dry, add your robe hooks along the top rail. Space them however makes sense for what you're hanging. We used standard robe hooks from the hardware store and they've held up fine.
Customize the slot spacing for your gear. The measurements above worked for our mix of bikes and scooters, but measure your own wheels before cutting. A little extra room in each slot makes loading and unloading much easier.

Pocket screws make assembly cleaner. If you haven't used a pocket hole jig before, this is a good project to try it on. The joints come out much stronger and cleaner than toe-nailing.
Test fit before you paint. Once everything is assembled and before you touch the paint, load the rack up with your actual bikes and scooters. Make sure everything sits the way you want.
Paint makes it look legit. An unpainted wood rack looks like a construction project. A painted one looks like a product. Worth the extra hour.

This is a genuinely useful project that makes a noticeable difference in a garage every single day. If you're looking for the next build after this one, check out our DIY bike ramp for something the kids can actually ride.
