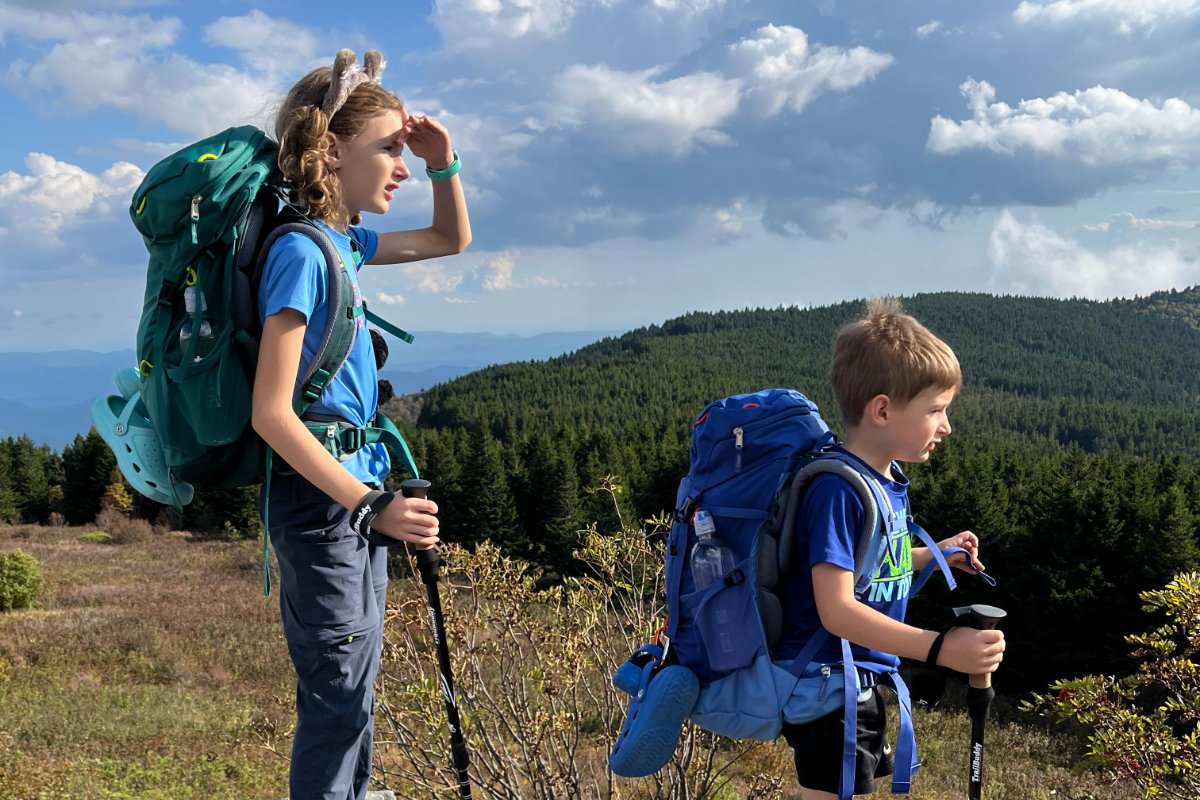
It’s now after 7 p.m., deep in the middle of the Appalachian Mountains near Black Balsam Knob. I’ve been on many backpacking trips, but this one’s the first with my kids. We’ve hiked over 4 miles, the sun is setting, and we’re still trying to find a campsite while ignoring complaints from a tired and hungry 6 and 10-year-old. There are no TVs, shelters, or microwaves for miles… Eventually, we find a spot, set up camp, have dinner, and thankfully recover our spirits.
In this guide, I’ll share my experience, focusing on how to make things go smoothly with kids, tips on what gear to purchase, and a checklist so you can confidently undertake an overnight adventure with your family.
And if you want a preview of another trip we did, watch the video below to see what the experience was like:
Isn’t regular camping enough? Camping these days often involves setting up a tent or camper in the middle of a gravel pad, surrounded by other campers, electricity, water, and a short ride to the store. In contrast, backpacking is one of the last ways to truly get away from technology and remove all barriers between yourself and the great outdoors. The extra challenge means you’ll escape the crowds and see places most people never will.
The great thing about taking your kids is that they’ll acclimate to physical exertion, getting caught in the elements, dealing with discomfort, unplugging from phones, getting dirty, being in the dark, and braving wildlife. This becomes harder as they get older and can even result in adults who are uninterested or afraid. Break the ice now!

Backpacking with kids is similar to standard backpacking, but there are some additional things you need to consider and prepare for.
How old do they need to be? You can get as adventurous as you want here, but very young kids will need to be carried in a backpack carrier or will be limited in how far they can walk. My personal opinion is age 6 and older is when they can start to really participate including hiking short distances and carrying a pack.
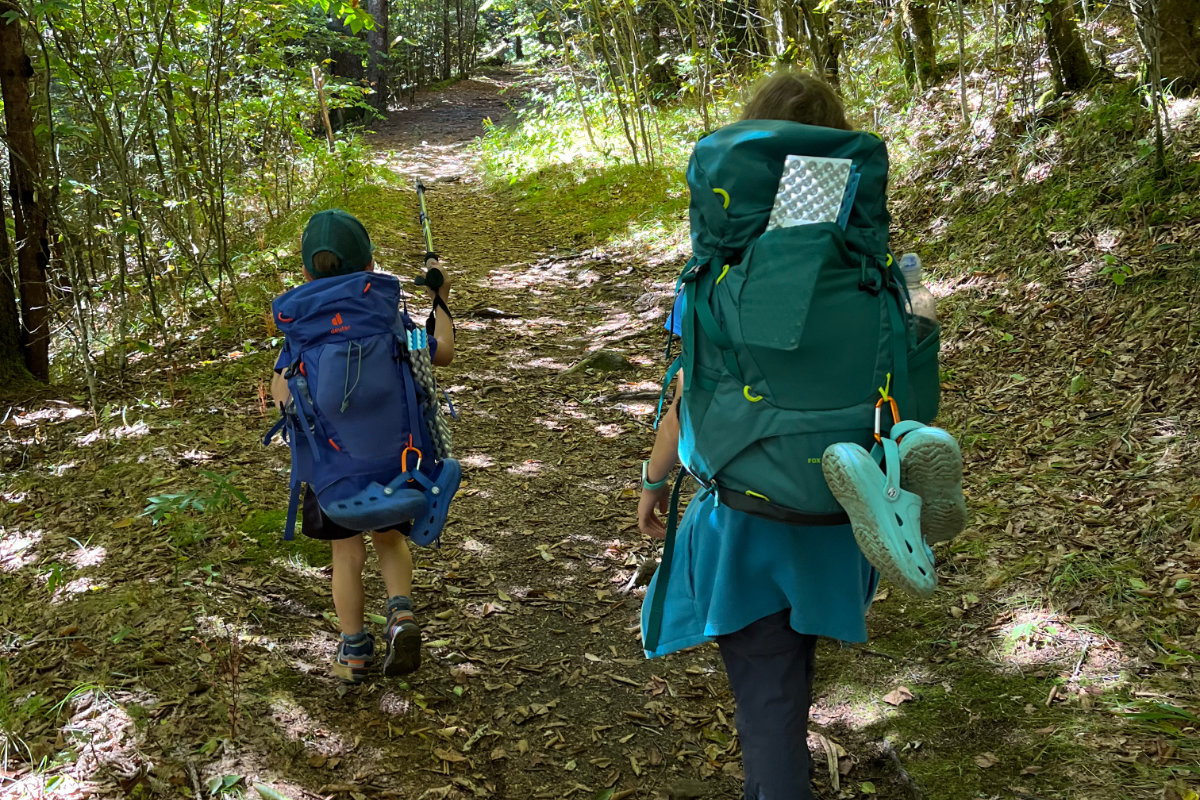
How far can they hike? Consider how much hiking your family does regularly, or even try a practice hike. For young kids or those without much experience, stick to a mile or two total. Others can go 3–5 miles, while more adventurous kids could go 5–10. Keep in mind that carrying a backpack will reduce how far they can travel, and elevation change, terrain, and conditions will also make a difference.
How long should the trip be? Start with an overnight. It’s a good way to build confidence in a low-stakes situation. Once you’ve broken the ice, subsequent trips are much easier.
What gear do I need? These days, there’s plenty of kid-sized gear on the market, including shoes, backpacks, trekking poles, and clothes (see specific gear recommendations in later sections).
How much pack weight can kids carry? While adults can carry about 20% of their body weight, kids should stay around 10–15%. So if your child weighs 50 lbs, they can carry roughly 5–8 lbs total. For young kids, this isn’t much, which means they’ll only carry small items, clothes, and a sleeping bag, while you carry the rest.
What time of year is good? Avoid extreme temperatures. Depending on your location, plan your trip for when the weather is milder. This will be safer for your kids and help you avoid bulky gear for winter weather or lots of extra water for hot conditions. I live in the southeastern United States and tend to aim for late spring or mid- to late fall, when the bugs are gone and the temps are cool.
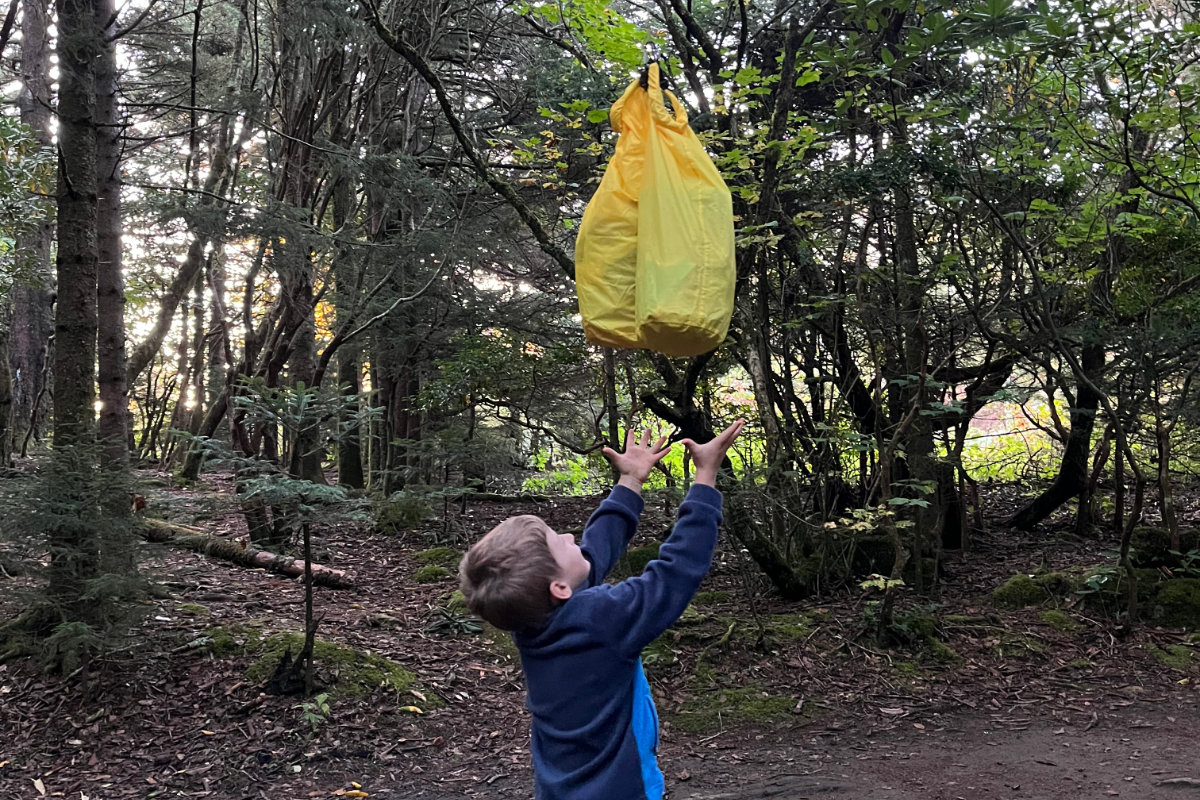
What about wildlife? Consider whether there are dangerous animals in the area and take proper precautions. Follow proper safety and food-handling practices, and use bear bags or canisters as needed.
What about first aid or emergencies? Carry a kit for burns, cuts, headaches, splinters, and other common issues, and have a plan for reaching medical help if a major issue arises. If you’ll be off-grid with no phone signal, consider bringing a satellite phone.
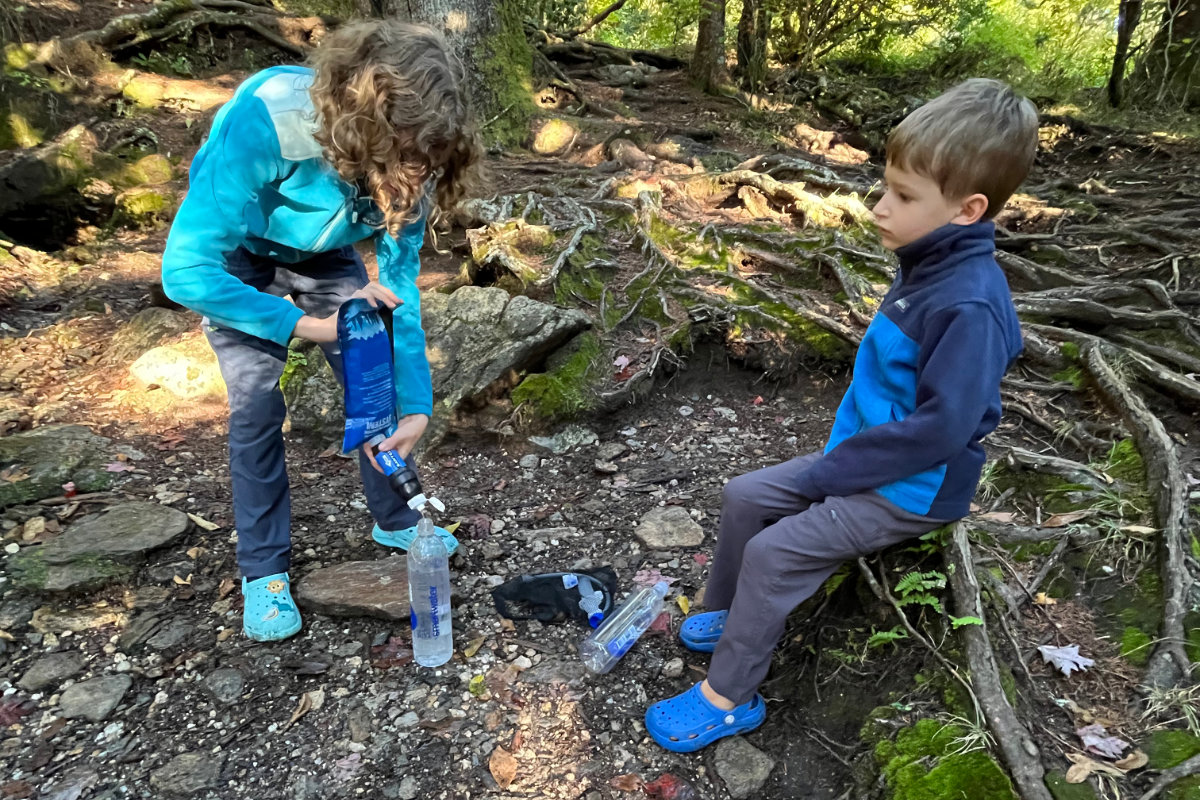
Involve your kids in everything. Especially as they start to develop their own opinions, being involved makes it less of something “Mom or Dad are making me do” and more of an adventure. Let them pick the location from some options, show them the map and have them mark out the route, and let them pack their own gear. Once at camp, let them help pitch the tent, light the fire, cook the food, and filter the water.
Do practice hikes. Acclimation is important, as it reduces your kids’ discomfort and helps you gauge what distance they can handle. Our kids have been on many hikes with other families, and it’s easy to spot the kids who spend most of their time inside, away from bugs and dirt.
Go regular camping first. If you’ve never been camping, start with car camping (driving into a campsite and setting up). It’s easier to plan for and has more comforts like a camp store, power, water, bathrooms, etc. We did car camping multiple times before going backpacking.
Make sure the conditions are good. Nothing kills motivation like getting rained out, freezing, sweltering, or being eaten by mosquitoes. You want your first experience to be good. Mid-to-late autumn is a great time when temps are cool and bugs are minimal.
Don’t take complaining (too) seriously. Last year on a trip to Glacier National Park, we completed a 9.6-mile (15.4 km) hike to Iceberg Lake. We didn’t break any speed records, and the kids were definitely complaining toward the end, but soon after they were jumping around the campground and begging to visit the camp store. Go figure.
Bring plenty of snacks. I learned this the hard way. Nothing helps reduce fussing or grumpy attitudes like some energy bars, candy, or flavored water to keep them energized. Toward the end of the trip, my kids started getting fussy, and some candy helped smooth things over.
Give them their own gear. Our kids love flashlights, backpacks, carabiners, pocket knives, pack buddies, hiking shoes, and all the rest. They also love going to REI and asking us to buy everything in the store.
Give yourself plenty of time to hike in. We started too late in the afternoon and ended up setting up the tent in the dark after trying to find a good spot.
Bring games. In between exploring, boredom can set in. A simple card game (Uno, Go Fish, etc.) is lightweight and a great way to pass the time at camp. There are also many other options, including nature identification or camp games.
Embrace an ultralight mindset. You’ll be carrying gear for yourself and your kids, and weight matters. Be aggressive about reducing the weight of each item (no giant aerosol canisters of sunscreen) and leaving unnecessary items at home. Filtering water is a great hack, as water is very heavy.
Commemorate your adventures. When we go somewhere, we buy magnets that the kids can display in their room on a magnet board from IKEA. Over time, it builds a nice collection of memories and motivation to do it again!
Write down your retrospectives. For each trip, I create a digital note with my packing list where I also record any thoughts on what could have gone better or what gear I wish I had.

In later sections I list the exact gear I use and a handy checklist, but here are some general tips. I live in the southeastern United States, so you may need to adjust for your own region.
I generally look for wilderness areas in mountains or national forests that offer scenic views and natural beauty but also a short hike in. You can find trail recommendations on sites like AllTrails, Reddit threads, in online articles, through ChatGPT, or in books about backpacking in your state or region. Images and ratings from trail reviews are great ways to vet different options.
Generally, there are backcountry trails near state and national parks or wilderness areas. Confirm that backpacking is allowed and check whether you need permits to access the area.
It’s also helpful if there’s a water source along the trail, ideally near your camp. If you’re not sure, there are backpacking apps (All Trails, FarOut) that indicate these kinds of details.
Weight and size are key here. The more you pay, the lighter your tent will be. Tent sizes are rated by number of people. Keep in mind these are usually “cozy” sizes so for example a 2-person tent might barely fit two adults (with no room for gear) but will be fine for a parent and child. Make sure whatever tent you choose fits your sleeping pads, and pay attention to the seasons and conditions it’s rated to handle.
Bulky sleeping bags won’t fit easily (or at all) into small kids’ backpacks. If you’re camping in warm weather, lightweight summer bags will work. For colder months, look for compressible down bags. The low-temperature rating on a bag is usually a “survivability” limit. The rule of thumb is to add 10 degrees to get the comfort rating. So, a 20-degree bag will work for 30+ degree weather. While down is lightweight, warm, and compressible, it loses its insulating power when wet, so be sure to protect it from rain.
Sleeping pads are not just for comfort; they’re essential in cold weather to prevent the cold ground from seeping into your body. Check the R-value to ensure it’s rated for the season you’re camping in.
Unlike standard school packs, backpacking packs are designed to distribute weight to your waist. Sizes are generally listed in Liters. When you take kids, a little extra capacity is helpful (I have a 65L pack). Make sure you measure yourself to see what pack size is right for you. Some packs have the ability to adjust to different torso lengths which can be great for growing kids.
There are many options for what to bring, just make sure your food isn’t perishable and not overly heavy or bulky. See my food ideas section in the packing checklist.
Freeze-dried food (e.g., Mountain House) is the ultimate in portability; you only need a stove, a pot to boil water, and a long-handled spork to eat it right out of the bag. But freeze-dried food is expensive and requires heating water. I like to use it for dinner and maybe breakfast, but prefer alternatives for on-the-go lunches. I’m also pretty “lazy” and don’t want to prepare anything that requires much prep, cleanup, or cookware.
The amount of water you need to bring depends on whether there’s a water source nearby. Make sure to account for both drinking and cooking needs. I usually take two 1L Smartwater bottles for myself and have the kids carry smaller bottles, then filter water at the campsite. You should always filter water, even when high up in the mountains, as most streams and lakes have some level of contamination.
If you’re camping in cold weather, be careful about your water bottles or filter membrane freezing. I usually bring them into my tent and sometimes keep them inside my sleeping bag to prevent this.
This is highly dependent on the temperature and terrain you’re tackling, but it doesn’t need to be complicated or expensive. In general, layering is the best way to adjust to temperature changes along the way.
In hot weather, athletic shirts and shorts work great. In cooler weather, switch to hiking pants, long-sleeved shirts, and a fleece. In cold weather, layer up with a puffer jacket, hat, gloves, and base layers. I always check the weather beforehand and tend to bring a fleece or pants just in case it gets chilly in the evening or short sleeves if I think temps might spike. Avoid cotton, which traps moisture, and stick with synthetics or wool. Down puffer jackets are great outer layers and also highly compressible.
Shoes can be athletic shoes, grippy trail runners, or hiking shoes or boots, depending on the terrain and your preference for ankle support. If it’s a short distance, you really can’t go wrong and can just wear tennis shoes. Crocs or sandals are great to carabiner to your pack and use for river crossings or around camp. Waterproof shoes can be nice in snow or wet conditions, but also take longer to dry out.
I avoid backpacking in bad weather, but if it looks iffy, I’ll bring a rain jacket and pack cover just in case (mountain weather is unpredictable). You can also put spare clothes inside dry bags or ziplocks for extra protection.
For an overnight trip, you can get away with very little (trust me), but optional items include a toothbrush, sunscreen, bug spray, and soap.
There won’t be any potties. Make sure you bring toilet paper, a trowel to dig a hole, hand sanitizer, and optionally, wipes. If you’re not sure how to handle this, look online as there are plenty of articles that explain the details.
A small kit that covers minor injuries and issues like headaches, splinters, burns, blisters, bug bites, and small cuts is usually sufficient for an overnight trip. You can make your own kit or purchase one.
Generally, the more you pay, the lighter and more compact your gear will be. But if this is your first time, you may want to cheap out and upgrade later.
I bought a used sleeping pad that leaked during a trip to Montana, leaving me to sleep in the car to avoid the cold ground. You should do this regardless, but bring patches if you are going to buy a used pad.
These are items I purchased after a lot of research to balance cost, quality, size, and weight. Many of the items were on sale at the time so keep that in mind. I’ve only included the main items here, so be sure to check out the full checklist at the end.
Here is the personal checklist I’ve built (and tweaked) over many overnight trips, tailored for 2 adults and 2 kids. This list assumes you’re doing minimal cooking with freeze-dried food, so adjust as needed.
(Printer Friendly PDF Version)

As I’m writing this, we’re getting ready for another backpacking trip. This time, I know what I’m in for, the prep is quick, and the kids can’t wait to go.
Authenticity is one of our core values. This content was created by real people. Imagery and stories were not generated by AI.
