If you've never tried outdoor rock climbing before, it can feel like one of those activities that's only for people with a ton of technical skill who enjoy taking extreme risks. Looking at you, Free Solo. But this isn’t true at all.
Basic bouldering and top roping are not hard to do safely, even for beginners, and it can make for an epic outdoor adventure with your family. Kids build confidence and everyone gets a workout.
We recently took our kids out to Cherokee Rock Village in Alabama for a day of bouldering and top rope climbing, and everyone from age 6 to 11 got off the ground and returned in one piece. In this post, we’ll cover what we learned so you can get out and try it too.
One disclaimer up front: we are beginners. Don't treat this as a technical climbing guide. For perfecting technique there are better resources out there and we'll link to some below. If it's your first time out, go with someone who has experience or hire a guide.
Cherokee Rock Village sits on top of Lookout Mountain in northern Alabama and offers some of the best outdoor climbing in the Southeast. It's a great first outdoor climbing destination if you're within driving distance. The views from the top are genuinely worth the drive on their own. They also have a campground if you’d like to stay overnight.

The site has a variety of rock formations for bouldering and established routes for various types of rock climbing. The Boy Scout Wall specifically has pre-drilled anchor bolts at the top, which makes it an ideal spot for beginners setting up a top rope for the first time. There are also tunnels, slot canyons between rock formations, and hiking trails throughout the area that make it a full day out even if you never touch a rope.
Before getting into ropes and harnesses, spend some time bouldering. Bouldering just means climbing around on rocks without a rope. No special equipment required, and it's a great way for kids to get comfortable navigating rock faces and heights before they're harnessed in.

Cherokee Rock Village has plenty of spots for this. We spent a solid hour exploring before lunch, found some great rock tunnels and formations to scramble through, and by the time we got to the climbing wall the kids were already comfortable moving on rock. This can be especially helpful for younger kids who may be hesitant.
Top roping is the most beginner-friendly form of roped climbing. The rope runs from the climber, up through an anchor at the top of the wall, and back down to a belayer on the ground who manages the slack. If the climber falls, the belayer locks the rope and the climber hangs safely in place. It's a very controlled way to climb and a natural starting point for families.

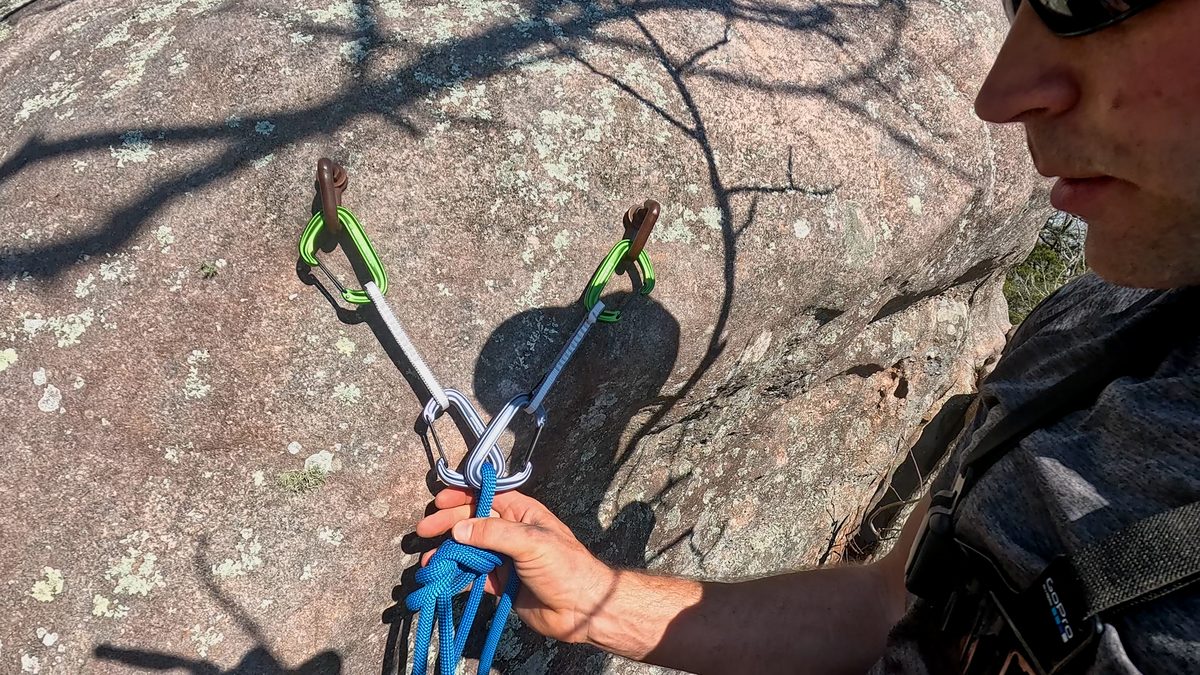
At Cherokee Rock Village's Boy Scout Wall, there are pre-existing anchor bolts drilled into the top of the rock. There are many ways to build anchors with these bolts, but we went with the simplest, which is to use two quickdraws oriented in opposite directions. The rope feeds through both carabiners at the bottom, making it strong and redundant. Check out this video about building an anchor.
The standard knot for tying a climber into their harness is the figure eight follow-through. Feed the rope through both tie-in points on the harness, trace the figure eight back through itself, and pull tight. You know you've got it right when you can count five pairs of parallel strands in the knot. Tie off the tail so it doesn't flap around. Check out this video about tying a figure 8 knot.

We used an ATC belay device, which is one of the most common and straightforward options out there. The rope feeds through the device, which clips to the belayer's harness via a locking carabiner. The brake hand stays on the rope at all times. As the climber goes up, the belayer takes in slack. If the climber falls, pulling the brake hand down creates enough friction to stop the rope. Before the climber starts, there's a quick call-and-response: "On belay?" "Belay on." "Climbing?" "Climb on." Keeps everyone on the same page. Check out this video about belaying.

You don't need much to get started with top roping. Here's what we used:
I got all of our harnesses used on eBay and Facebook Marketplace. Obviously inspect your gear for wear, but ours looked like they had only been used a few times. These are adjustable to an extent, but make sure you get something that is generally the right waist size to start with.
I ended up getting the rope new at REI, but was able to get a discount by watching for a sale.
I got my ATC and carabiners on Craigslist a decade ago and they still work great. Purchased the quickdraws at REI.
Total cost to get started with a basic setup like this is a few hundred dollars if you shop around and get used gear where you can. If properly maintained, most of this equipment will last for a very long time. Renting is also an option in some areas, so worth a quick search if you don’t want to commit to buying your own stuff.
Start with bouldering. Getting comfortable on rock before adding harnesses and ropes makes the whole experience less overwhelming for younger kids.
Ages 6 and up can do it. We had kids from 6 to 11 on the wall and they all got up with varying levels of help. Younger kids may need more encouragement and assistance on the harder sections, but the basics are accessible.
Go with someone experienced or hire a guide. For your first time out, having someone who's done it before makes a big difference both for safety and for not spending half the day figuring out gear.
Keep the first routes easy. The goal on a first trip is to get everyone on the wall and have a good time, not to send a hard route. Pick beginner-friendly lines and save the harder stuff for when the kids are asking to come back.

Outdoor rock climbing is one of those activities that opens up a whole category of places worth visiting. Once your kids have topped out a wall and looked at the view from the top, it's hard to get them to stop asking when they can go again.
Get out there and try it.
